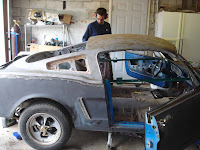
Once the back part of the roof was free from the car most of the cutting work was done. The tricky part came from trying to match up the new fastback roof with the car. We first began by cutting the side of the fastback roof about 1.5 inches down along the top seam of the quarter panel. Next we removed what was left of the front windshield on the fastback roof. Don't forget to use a torch to melt all the factory lead filler around the seam. I will go back over with body filler to replace the lead, but I only removed what I had to, to get to the seam. It is important that you pay attention to the front of the roof when you cut it. look closely at the factory seams. While looking at the car with the coupe roof still attached in the front, you notice how on the side supports of the windshield in the top corner just before the metal transitions to the roof there is a slight bevel.
 We used this bevel as a guild to make sure we lined of the fastback roof in the right spot. It was simple to make these cuts but hard to make them at exactly the same angle for both the fastback roof and the coupe roof. We ended up having to fill in about a 1/4" gap with weld on the inside of the roof support. Check out the diagram in the picture, you should be able to line up the front of the fastback roof exactly with the bevel at the support transition.
 A lot of minor cutting was made in the rear of the roof so that it could be set in right. The rule of thumb we played is if it was in the way then it had to go. Just take your time and make what ever adjustments you need to in the rear so that the seams line up. If you do the front of the roof right the rest of the roof should just about fall into place with some minor adjustments. It is also helpful to have a buddy at this point so one can force the roof in place while the other tacks it in. It is also helpful to have someone sit inside the car a force the quarter skin out so it makes a tight lap weld along the quarter seam.
 Well that about sums it up for the dirty part of the conversion. My next goal is to get new quarter skin and replace them, so I will have to go back over my lap weld. Currently I have the car on a homemade rotisserie and I am beginning work on the cowling and under body so I will have more on that later. For now I will just include some more pictures that I have taken during the conversion.


No comments:
Post a Comment